Pages

Pages

Halloween Glee - Style Arc

Thought I'd get on board with a theme today for spooky season. Sort of. Not particularly sinister but it's black so that will have to do.

The pattern in question here is the Glee Knit Top by Style Arc. It's a faux wrap, with side tucks and asymmetrical hem and as it happens, excellent for leggings!

I was very lucky and won this pattern on Instagram a while back and I had been hoarding it for a while (mainly due to it being 54 pages of PDF to stick together). Drawn to the interesting shape and need for a few tops that were not just standard t-shirts, this called out. 

Sizing was deliberated as I was cautious about a gaping neckline. However I went with my usual 14/16/18 grade for Style Arc and it worked a treat, no adjustments made. 

The fabric is 'Ottoman Knit' from Lamazi Fabrics and I had a fair amount left from a Union Swing Dress earlier in the year. It feels glorious. 

The trickiest part of the pattern was adding the neckline binding as the pattern piece was very narrow. I ended up just folding it in half and using a cover-stitch to hold it down. 

Tip: if you make this top, make sure you do the neckline binding BEFORE attaching everything at the side seams! Ask me how I know...

A little bit of secret neon on the inside! I also hemmed this top with neon cover-stitch and I can't get enough of this back view on the mannequin. It just makes my heart jump a bit seeing that flash of light.

All in all a lovely and very comfortable top. It's tighter than my usual baggy attire but I don't mind that as the fabric and side pleats are very flattering. The V-neck is very low cut - although it doesn't gape and does cover everything! I think I may wear a bralette or vest top underneath just for added cover and warmth. 

At the time of publish of this Halloween post I shall be haunting the corridors or Belsey Bridge for the second Norwich Sewcials Retreat. I think the scariest part of this is how little sleep I have had since the last one! More on that to come :)

À la prochaine...
Feel free to comment and come and say hello on InstagramFacebookTwitterPinterest and Bloglovin too xxx

Knit for Victory - Pigeons!

Coming to the blog a little differently today with a bit of knitting. It's no secret I do enjoy making knitted creatures and since discovering Knit for Victory, birds have featured pretty heavily.

I felt I needed to record a little happy moment here as in February 2019, just before lockdown 1.0 happened, I started my little knitting journey, inspired by a couple of pigeons at the Norfolk Maker's Festival Exhibition.  I reallllllllly wanted to make those pigeons. 

Dreams can come true.


 I've posted this picture before but I thought it was worth repeating. This was where I started :

 A couple of years of practice (I can still only do basic stuff) and it turns out pigeons are a possibility! The patterns by Nicky Fijalkowska (Knit for Victory) are absolutely incredible. Firstly every single pattern is ridiculously cute. Secondly Nicky is hilarious. 

These best bit of all her patterns is that they are knit flat. And simple. The instructions walk you through every line of knitting and the separate pieces of the bird are relatively straightforward, with the magic happening when all elements are stitched together at the end.

This is Bill and Albert. Check out that side eye from Bagel Cat!!!

 They started to get nervous so flew up to the trees.


 It was a little chilly out and so they decided to take their lunch indoors.

All fueled up Bill and Albert decided to visit a gallery and see some pigeon art.


They even bought a guide book....

It may have taken a long time but I'm very happy with my two pigeons and they appear to be quite happy in their new home too, having nested in our living room. 

Wishing you all happy crafting and always learning...


Feel free to comment and come and say hello on InstagramFacebookTwitterPinterest and Bloglovin too xxx


Style Arc - Parker Ponte Pants Party

 Despite having make these trousers a grand total of FIVE times - they never seem to have cropped up on my blog! I really don't know why not as I wear them all the time.

The trouser pattern in question is the Style Arc - Parker Ponte Pants.

They are a glorious hidden gem of a trouser. Absolute secret pyjamas. Stretchy ponte, elasticated waist, but kinda...smart looking? Winner. 

This fabric was kindly gifted to me by Minerva in exchange for a post on their site so I will link you to that here if you fancied a read. 

Optional back pockets and a faux front pocket - however I have drafted a pocket bag for these and made them for a couple of pairs. 

Below are my super-duper goes with most thinks black pair which you can see has a pocket. They are also truer to the original pattern as they have the slim leg and turn ups. The black and white pair above have a narrowed leg for a skinny fit.

As you can see from the pictures I'm absolutely loving my Parker Pants and all their stretchy glory.

Bonus pics of a couple of other pairs I have made!

Safe to say this pattern is a TNT for me and will be staying firmly in my pattern collection.

 Feel free to comment and come and say hello on InstagramFacebookTwitterPinterest and Bloglovin too xxx


Perkins Shirt - Ensemble Patterns

 Hola a todos!

 Not a lot of sewing has been going on here for a few week and the ol' brain was stagnating a tiny bit so a fresh challenge was needed. 

Enter the Perkins Shirt Dress by Ensemble Patterns. 

I love making shirts, I think it's that they break down into small steps very easily and so catching a bit of sewing time here and there is much easier to do when each step is a 10 minute job. 

The Size 

My measurements put me at a 16/18 however there is a very handy finished measurements chart provided and from this, that size was looking a little too roomy.  I decided to cut a straight 14 as this still gave the bust a very generous 14" of ease. Instead of bringing the shirt into a cocoon shape, I just cut straight down for a straight shirt. There was still sufficient ease to get around my hips.  


The Pattern

This shirt stood out to be on The Foldline as 'a bit different' due to it's raglan sleeves, unusual shape and the split collar. A shirt with all the trimmings it seems. 

There is a regular version and a gathered version and 3 length options for each. There's also a manadrin collar, normal collar and split collar option for all of those!

In need of a puzzle I went for a gathered version, tunic length, with split collar.

 The most time consuming part of this make was by far the cutting out. So very many pieces. 

What is not evident from the pictures is that there are NO exposed seams anywhere! If you're into pretty guts (neat insides) then you'll love this. The back yokes, both sleeves and sleeve hems are 'burritoed' if that can be used as a verb and the rest french seamed.

I did top stitch the split yoke together instead of trying to stitch inside of it, it gave a much neater finish at the V point as I wasn't too good at the proper method in the instructions.

There was a serious triple burrito situation happening on the sleeves and I'll level with you - I really don't know how I managed it, it just sort of, worked. (After much entanglement and flailing around). It certainly was the brain teaser I was after. Don't be put off though, once done it looks great!

The split collar is a great little detail which I'm surprised I like so much (not being one for extraneous 'jazz' on my clothes.) It pulls in with some enclosed neck ties for a great bit of eye-candy detail. 

A bit of weirdness with this pattern was that the back piece gathered nicely, but once I'd gathered and distributed the front pieces - the gathers essentially just disappeared. Pretty sure that's me having done something wrong but I still like it.


The Fabric

Gorgeous gorgeous green teal zebra viscose from Fabric Godmother in the sale. Mmmmmm I love it. The camera had some difficulties picking up the colour but it's a gorgeous green in real life. I think this colour is now out of stock but there are others. 

The Details

I love popping a label in my makes and so this Kylie and the Machine one was ideal. When 'good enough' is more than fine.


And last but not least, it's been a while since I popped a tortoise on something and so these little beauties from Textile Garden found their stash-to-sewn destiny on this shirt. 


 I hope this review is of some use - I've not seen too many versions of this pattern out there but it's definitely one I would repeat in due course!

Hasta leugo!

 Feel free to comment and come and say hello on InstagramFacebookTwitterPinterest and Bloglovin too xxx


Greenstyle Creations - Tempo Tights & Tortoises


I managed to sneak a few extra photos in when the weather was lovely last week and Clyde was all about getting in on the action... hence the tights and tortoise. He's such a nosey fella and a sucker for a bare toe to nip.

Today we have the Greenstyle Creation Tempo Tights - they seem to have quite the reputation in the sewing community and I can see why!

These sports leggings have a brilliant design to them and a great scrap buster due to all the sections for colour blocking. There are several waist band options too - I went for an ultra-high waist with a 'heart-shape' back. I entirely forgot this detail when taking pictures and so this is the best it gets as a visual. It's essentially a little dip in the centre back waistband that makes your booty heart shape. Ish.

For the size I fell as an 'H' at the waist and 'I' at the hips. I did grade between the sizes but I should have seen the bit where it said to choose the smaller size when picking which one to go with! They are compression tights and I did end up taking them in very slightly in the leg when constructed. 

They were not kidding about an 'ultra-high' waist. I mean we're talking Bee Gees levels of highness. Again I totally failed to capture this due to my top!

Quick interlude about the top - it's also Greenstye Creations Xpress Tank and WOW that is also express. 1 piece of fabric, 1 pattern piece, 30 mins. It's an 'open-back- top but actually gives a lot of coverage with minimal lower back flashing.


 Back to the leggings. 

Fabric choices were some black Italian Matte Lycra from Fabworks - and they have broken my heart as I don't think they stock it anymore!! This stuff is incredible. Perfect opaque qualities for sportswear. 

The absolute jazz which is the side panels and waistband is a lycra from Rainbow Fabrics. Resistance to the neon was week. I'd been saving it for swimwear but gave up on that idea and figured I would enjoy these leggings much more.

I must have been feeling brave when I made these as I even did a little decorative coverstitch over the seams! This is some neon Madeira Aerolock (woolly nylon) thread in the lower looper and regular threat in the needles. It's definitely not perfect especially at the start and ends of the seams however good enough for me. Love the brightness of these!

My very small grip about these is that the waistband only suggests a bit of clear elastic in the seam for stability and to hold them up. For me that's not enough and if I made them again I'd definitively be popping in good bit of 1" elastic up at the top and between the layers for extra hold. 

To the gym these shall go to be tested...

 Feel free to comment and come and say hello on InstagramFacebookTwitterPinterest and Bloglovin too xxx

Last of the Summer Sewing Part VI - Hana Tank Pattern Scout


About 2 days ago I was about to break with annual tradition and scrap my 'Last of the Summer Sewing' post this year because.... well there really hasn't been much of a summer this year in the UK and I also haven't really made many summer clothes!

Sewing mojo hit a bit of a low in August although I had been working on some special gifts for friends getting married in a few weeks and that was time consuming. Sorry no pics for now it's a surprise for them!

All of a sudden the heat is back and it is gorgeous outside, so whilst spirits are up and the sun is out - I thought a quick blog post was in order!

I needed a little 'palette cleanser' project to kick start me a little bit and chose this gorgeous little tank pattern by Pattern Scout called Hana. A cute little basic which I didn't think too much about at the time, just something to doodle about with and sew up some stash fabric. 

Never having used a Pattern Scout pattern before (I own the Nellie Joggers but haven't made those yet)  I wasn't sure what to expect.

It wasn't until I tried it on for fit that I suddenly realised it was a great staple and really well drafted! Dare I say on a par with the Ogden and Ashton tops?!

Size I went for 16/18 as per the chart. I love that the pattern gives high bust and also 3 different cup sizes for options. The pattern also has a whopping 7 variations for tops and dresses! Very inclusive. I think I would probably size down to a 14/16 next time and see what that does. It's a loose fit and I think there's ease to take the armholes in a bit as well as the neckline up very slightly. My version seems a lot looser than shown in the pattern pictures. 

I chose some stripe viscose from the stash - I have zero idea where this came from I'm afraid it's been in there a while! 

The top is loose and so I can get it over my head and the button placket therefore got sewn shut. The pattern is a functional placket but I couldn't be bothered with all the buttonholes so just popped the buttons on for decoration. 

The stripes reminded me of waves so I was pleased to find a use for some fish buttons, also from the stash (originally from Textile Garden). I do love the pop of colour it gives.

The neckline and arms are bias bound for a lovely clean finish and they do shape to the body really well.

I opted for Version C1 which is a tie front top. I did worry it was going to be fairly mid-riff exposing and cropped but not so, a lovely length over shorts/trousers. 


As the queen of  'can't just leave things alone' I have wondered about cutting the ties off however I think I'll leave it be and try another version!

A great hidden gem of a pattern this one!

 Feel free to comment and come and say hello on InstagramFacebookTwitterPinterest and Bloglovin too xxx


It's all Heart - WBM

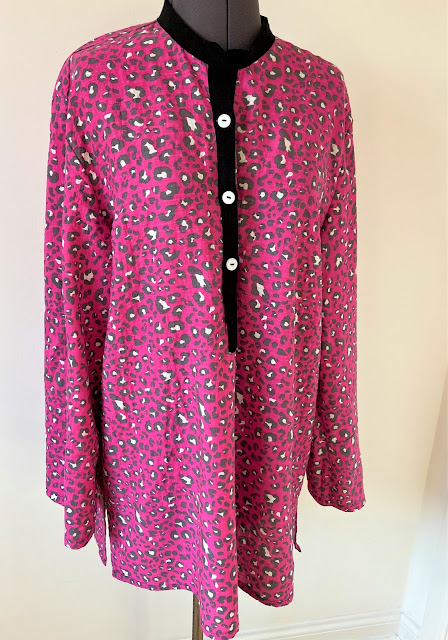
 The Heart Tunic - a pattern by Wardrobe By Me

I love to make shirts and this one appealed immensely. I bought a Tunic Kurta from South East Asia Collection in Norwich a few years ago and it's the comfiest thing ever for covering up in hot weather. (Totally worth a visit if you're in the area!)

The Heart Tunic popped up on my radar and it instantly drew me in as it looked just like my 'real' Indian version.

A chance to recreate a well-worn favourite - definitely worth a shot!

In addition to being a lovely shirt pattern, it was the chance to do a sew-along with The Willowers (my IRL Thursday sewing group who I have not seen for many many months now). We all selected different materials and styles and made our Heart Tunics over the course of June. It felt nice to be close to the sewing ladies again even just virtually by way of a shared make.

I went for the basic version View A that has no cuffs, but a sleeve you can roll and button up. It's hip length with side slits and a box pleat at the back yoke for easy-breezy fit. 

This is a size 16/18 and fit was spot-on for my liking. It pools a tiny bit at the back but who cares.  It fits across my back which is where I have most issues with shirts.

This fabric is 'linen look' cotton-viscose mix from SewAnonymous and the quality is lovely. The natural fibers made this a good choice for warm weather! (If we ever get more than 5 minutes of it). The black contrast is some scraps of Flow Viscose-Linen from Lamazi used on some other projects.

 
My favourite bit of this shirt are these hidden tabs which live on the inside of the sleeve, ready and waiting to flip out when you roll your sleeves up!
 
This was my second ever attempt at a placket neckline. The first being about 7 years ago which put me off for life. With a bit more experience under the belt, this one was still tricky (it took me 2 attempts) but got there in the end! 

There is also a FULL VIDEO of how to construct this tunic on Youtube which I discovered on attempt number 2 of doing the placket!

As with all Wardrobe By Me patterns, the drafting, instructions and guidance were immaculate so there's not many places to go wrong with this. 

There's this version of the pattern with bust darts, but also a 'Men's' version of this pattern too. Interestingly just called 'Tunic' not 'Heart Tunic'. 

I loved seeing how differently one pattern came out  when made by several people with differing styles!


 Feel free to comment and come and say hello on InstagramFacebookTwitterPinterest and Bloglovin too xxx