Reusable Beeswax Food Wraps - Tutorial

A little tutorial today! After the beeswax food wraps went down an absolute storm at Norfolk Makers' Festival, I thought I'd make a little write up of how to make them for anyone still wanting to give this a try. Full credit to @knittynattynora who introduced me to this great method.

Great for scrap busting and good for the environment too - why not swap your clingfilm for these easy wraps!

You'll need 100% beeswax - this can be bought in blocks or pellets. I got mine in block form from LiveMoor who also sell on Amazon. Use an old grater and shred that wax...


Take some clean cotton fabric an cut into squares/rectangles/whatever you like. I used these lovely little bundles just waiting their turn for a purpose.


 For nice edges use pinking shears for a good finish. You're also going to need a clean paintbrush!


Pop your fabric on an old baking tray (not one you will need for cooking!) and sprinkle on the beeswax shavings


Pop the tray into an oven set at a low temperature. About 120 degrees should be fine. Whatever you do, DON'T MOVE! The wax will melt in a matter of seconds and you don't want to burn it. Remove the tray from the oven and use the brush to spread the wax evenly ensuring it has soaked through all over without patches. 


Carefully peel the wrap from the tray - it will start to cool immediately and is easy to handle. If you can, hang it up somewhere to dry fully.


Wait - just let the wraps cool and dry, I left mine for the afternoon until they were cold and had gone stiff with wax.
Sammy waiting patiently in the sun...
That's all there is to it! The wraps are food safe and can be reused multiple times if you wash them in luke warm/cold water with a little soap. Don't put them in the dishwasher or microwave, they will melt!


The wraps take the shape of your bowls and wrapped items and the heat from your hand moulds them to stick in place.

Enjoy a very colourful fridge!

Feel free to comment and come and say hello on InstagramFacebookTwitterPinterest and Bloglovin too xx


Of Cats and Magpies

Hello!

Today comes courtesy of Fabric Magpie who very kindly sent and let me loose on 2.5m of some incredible glow in the dark Cat jersey!!

I need to point out this was sent to me for free in exchange for a blog post - however the content was not dictated at all, it was sent to show off this wonderful fabric. I opted for a maxi Blackwood Cardigan. 


Feel free to comment and come and say hello on InstagramFacebookTwitterPinterest and Bloglovin too xx

Sewing For Pleasure - Sewcials Road Trip

This is a pretty 'fresh' post by my standards! Having just got back from the NEC Birmingham for the Sewing For Pleasure exhibition I thought I'd do a little write up whilst it was still buzzing in my brain...(and before I collapse with exhaustion).

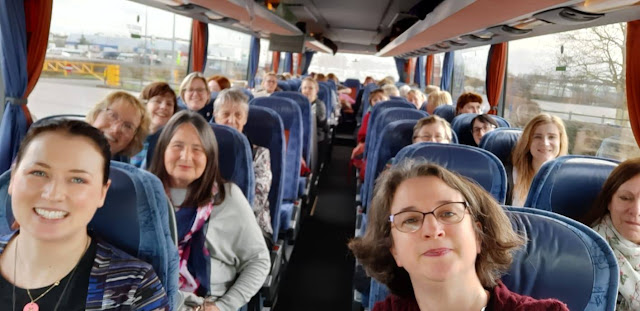
This was another of our little Norwich Sewcials ventures - get coach, get people, get fabric. Good times. Here is our van full of (hopefully) happy campers as we were leaving the NEC...


This was my first time at the NEC and only my second sewing exhibition (the first being Sewing Bee Live) so I thought I'd share some thoughts and highlights (whether you want them or not).

What struck me most was how much 'random' stuff there was. Don't get me wrong I thoroughly enjoyed the day and the sewing stands but I couldn't wrap my head around how massage, chinese hair clips or general 'tat' factored into things (other than obviously to fill space and make money). I did personally prefer the Sewing Bee Live exhibition, I just found Excel a lot nicer and the stands much more animated and relevant. That being said there were good times and goodies to be had at the NEC!

Of particular amazement to me was my discovery of TOFT. How this has passed me by I have no idea as I do love an animal... As a total newbie to crochet I fell in LOVE with Joanna the Lobster.


The fact someone has made this astounds me. The yarns and kits they had on offer were absolutely beautiful and the ladies were such good fun to talk to. Apparently the key to successful crochet is red wine. Fact. A few of Edward's Menagerie was also on display and you can buy kits to make them all!! The Fabric Wrangler settled for a book - so we can start at beginner level. Expect a lobster in a decade.


I finally got to see the infamous 'Geoff' in action at Mr Rosenberg's stand. I hear his name on a weekly basis at my sewing class as a few of the ladies are devout followers of Geoff and his bountiful bolts. Disciples of Geoff return with bags of beautiful, stroke-able goodies so I had to check it out. Not entirely my style however there were some BEAUTIFUL Italian silks that captured my heart. We very nearly bought some but were slightly priced out, having already spent our budget (and more) by this point. One day!


I picked up a beginner's knitting book as I thought I'd persevere and see what happened. Turns out a coach journey home is the place to give it a go as with a bit of encouragement and advice from fellow travellers I managed a few rows!


So what did we buy? Well.... good times were had at Fabrics Galore and Higgs & Higgs! 
I went for some awesome space themed viscose/cotton and teal double gauze with gold dots on for a couple of shirts. I also couldn't resist the colour of the lime/yellow heart viscose either! The top pieces of fabric are Sari silk which I have always wanted to get hold of and try sewing - I picked up these meter off-cuts for a bit of a bargain at the Silk Route.I'm thinking a simple Ogden cami for those to show off the print/colour and be cool in summer. Yes - there was a purchase at Toft, but it's a present so I'll not show it here! A few buttons were picked up at TotallyButtons 'just because'.


 Now - why are there some neon Aerolock threads there you may ask - errm.....because this is me lurking around the Janome stand...


and I MAY have bought a cover stitch machine. Maybe. Probably. Yes, I did. If anyone asks 'm blaming this guy:


Did you go to the show? Let me know what you thought :)

Feel free to comment and come and say hello on InstagramFacebookTwitterPinterest and Bloglovin too xx
Sew Your Own Activewear - Fehr Trade Selection


I'm continuing along the elastic lines today and wanted to share my activewear project with you. I have been using the Sew Your Own Activewear book by Melissa Fehr which I pre-bought whilst at the Sewing Bee Live exhibition in...::cough::...2017.

Yes, talk about late to the party - it's 2019 and I STILL hadn't completed my initial drafts started shortly after purchasing it. UNTIL NOW.


Goodness knows why it has taken so long. Each time I reach for gym wear I moan that nothing fits or is suitable and then 'make do' with some ill-fitting top that annoys me during exercise.  WHY?!

Due to being fed up of my own whinging, I set about making the Raglan Tee. The book comes with 4 basic blocks, which you trace to your size guide and then pattern alter as per the instructions for each of the 15 patterns. The instructions for pattern alterations are absolutely wonderful and I should not have feared the drafting. Step-by-step it takes you through each change with good illustrations and clear language.


I had been saving some absolutely beautiful bamboo knit from Ray Stitch for the occasion and  I am pleased to report it did not disappoint. Once you go bamboo it's hard to go back! I've recently discovered a new UK supplier SimplyBabooFabrics and they also have some great stock.

The construction was a little unusual for me however I did it as per the book. Unfortunately I put the sleeves in the wrong way and so my seams were showing! This was a happy bit of fortune in the end as I covered the seams with jersey binding and it made the top pop! The Snoopy is a little decal I made on the Cricut - I copied a cartoon, scanned it in and cut it on white iron on vinyl. So cute.


The size is pretty decent, its nice and loose which I prefer, but I think next time round I may shape the waist just to make it a little more fitted to avoid it creeping up my body and over the head when doing floor work. It has been tested in the gym and the fabric was excellent - super sweaty but it wicked away moisture well and there were no patches.

Next up was the Yoga Bottoms. Not necessarily for yoga but I preferred the shape and contour band for fit so went with these instead of the Active Leggings. This was also a 'two toile' situation.


Measurements put me at an L so I mocked up some leggings in scrap poly-lycra. I'm not sure if I had traced incorrectly but they were initially huge. The picture above is after I had taken a good 2 inches from the inner and outer leg seams. The book recommends a test fit so it was no surprise that fitting had to be done and after a bit of pinning, re-sewing and adjusting the pattern pieces I got my leggings block!

The next test was to try the basic pattern with all the bells and whistles. I went contour band, moto knee patch, side stripe, gusset and just for good measure....another Snoopy. My reasoning was that if I could get all the things on one pattern, there would be no need for any further toiles and I'd have a block for all variations. A friend from sewing class kindly let me have a go on her cover-stitch machine and now I'm a bit obsessed with it. This could get expensive.


This fabric was cotton lycra from Girl Charlee UK which was a much better quality than my first toile but certainly not gym appropriate. (See-through!)

Absolutely fine for yoga/sport/gardening at home but out of the house.... no-one needs to see your downward dog luv.

The waistband needs a better, thicker elastic for me to hold everything in but other than that the fit was pretty good.

With regards to the gusset feature I'm not sure if I need it or not. Firstly I can't stand the word so not having to type/say it again would be fabulous. It also felt a bit like the leggings were being pulled down at the crotch, and the range of movement was pretty good in the originals anyway. Will take suggestions on that one!


My favourite part of these is the side stripe. Oooohhhhh the possibilities. On to phase 2 of my mission - finding actual performance-grade fabric! (It shall be a true testament to the fabric if it can maintain its opacity on my derriere. Challenge set.)


Feel free to comment and come and say hello on InstagramFacebookTwitterPinterest and Bloglovin too xx

Pirate Peg Legs and Makers' Festival Part 2

Now that is a fairly random blog title.

A couple of weeks ago we were back at The Forum for Makers' Festival with a little pitch telling the world about the benefits of dress-making and making some beeswax food wraps!


We were on our feet all day so comfortable attire was needed - enter my usual uniform - the leggings!! Despite earlier new year musings on trying to move away from this basic staple of my wardrobe, I can't escape the fact that...I like them. Even if I do look like "someone stuffed a waterbed into a pair of Wranglers". And you can't fight nature. So why not be a connoisseur of leggings?

I came across this brilliantly themed fabric a few days before the event at SecondStarFabric called 'Make It Sew'. Not a company I was familiar with but they came up with some excellent service and the fabric is very high quality. 


Another slightly new to me company is Patterns For Pirates (P4P) - who I now have become quite a big fan due to the vast array of staple patterns and multiple versions available.

These are the 'Peg Legs' and I have to say - fit straight out of the packet with very little issue. Which for me is rare!

'One peg leg'
Their website is great as each pattern gives you a million pictures of women who have made these, of all shapes and sizes, so you can see what they will likely turn out like. Their Facebook group is also hilarious and a has wonderfully supportive and body-positive atmosphere.


As per the charts, I went for an XL and low and behold - leggings! The pattern is so simple and takes about an hour from start to finish. There is no side seam and they just wrap around the legs. Perfect for showing off a good print. You can whip up a pair with just 1 metre of fabric which is a bonus.

The absolute BEST part of these is the waistband. After some internet stalking I discovered there is an 'add-on' pack for this pattern (free) which includes a contour waistband that hugs you like a dream and seems to fix any rise issues at the front. I will never be making anything other than a contour waist...


Please excuse by bloody awful pictures. They were taken at 7am on my phone whilst rushing about trying to leave the house.

The leggings went down well on the day and had many comments from fellow crafters! There was so much to do and myself and The Fabric Wrangler were also next to a lady from Elegance of Henna and we got ourselves a little decoration...


To the other side of us was an 89-year old lady called Margaret who had knitted the entirety of Great Yarmouth sea front!!


I ditched the knitting in favour of crochet. How fickle I am. However maybe 1 needle may be more manageable than 2!? Eiether way, it was a wonderful festival and I'm pleased to hear it will be back again next year :)

Feel free to comment and come and say hello on InstagramFacebookTwitterPinterest and Bloglovin too xx