Pona Jacket Pairings - Helen's Closet

 Pass me the marmalade sandwiches and call me Paddington 'cos DAMN this is a yellow coat.

This is the Helen's Closet - Pona Jacket. Admittedly when the pattern first came out I wasn't too keen as I had only seen the cropped versions which were just not my cuppa. Then along came the lengthened versions, and the belted versions, and the fully lined versions.....and then love. 


The pattern is described as an oversized blazer that can be worn open due to the huge internal facings and also suitable as a beginner jacket pattern. The pockets are huge too. 


Drawn in to the belted jackets and the need to make something that wasn't a t-shirt and remind myself what spring colours are.. I pulled out this awesome wool blend and satin lining. 

The fabrics are both from Minerva (bought not gifted). The wool is a blend and is currently on sale if you were after any! Yellow and Coral versions here. There is a bobbly side and a smooth side so hopefully it stays that way.

The lining fabric was a satin which I chose for it's nice Spring feel and yellow accents too.

Size-wise - this is a 16/18 and just right. No modifications to the pattern at all, although it's a big loose jacket so very forgiving in that respect. Very true to size as I've found with Helen's Closet generally. 

There are actually minimal pieces involved in the jacket itself and comes together incredibly quickly. I especially like how the collar is attached and the facing top stitching runs into it. The instructions are clear and well illustrated.

My KirstinStride beetle brooches have found their permanent home!

The jacket can be left unlined with bound or finished seams however I fancied a bit of pizazz. My mantra is that 'linings must always be jazzy' and so the bright fabric fulfilled that criteria.

 The lining itself is also super simple (phew). The tutorial is here on how to cut and attach the pieces. 

I attached all my pockets and belt loops BEFORE adding the lining as I didn't want the stitching showing on the inside. Attaching the lining itself was also thankfully quite straight forward and a lovely finished when turned the right side out. 

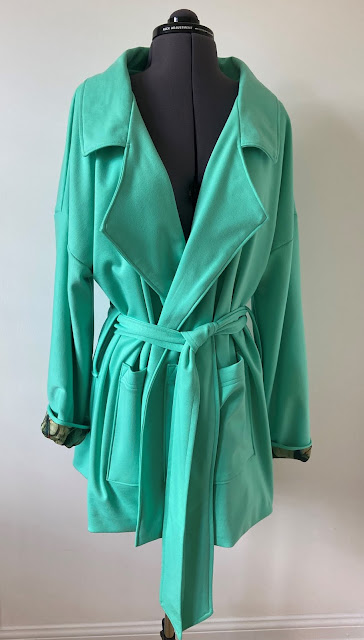
Not only did I make myself a Pona Jacket - I made my sister one too! (We live very far apart so no twinning with this one).

She'd fancied a mint green spring coat, and hey-presto - an early birthday present appeared. (I say appeared. 2 weeks of stitching and faffing later). This one drapes a little differently as the outer fabric is ponte! Although that is stretchy, the coat is big enough to take a woven lining and act like a normal woven coat. But soft.


Once again with the jazzy linings, some birds from Fabworks were selected:

Annnnd again just to cap off the present nicely - the addition of another bird! (Can you tell I love a theme?) Beautiful Bullfinch by Kirsten Stride


Well done if you made it to the bottom of this post, thank you!

Feel free to comment and come and say hello on InstagramFacebookTwitterPinterest and Bloglovin too xxx

Felt Fancies

 Not so much with the sewing today but a little crafty project for Spring.


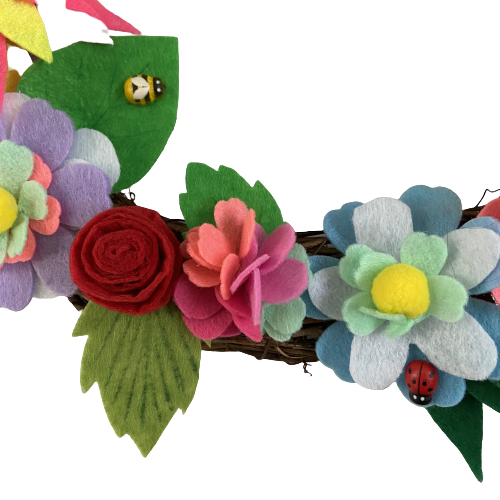
Norwich Sewcials held a 'floral felt wreath' workshop on Zoom the other week and we went crazy with the colours making felt flowers galore. 

Being a little rubbish at hand sewing and cutting anything fiddly I was surprised at how easy this was to do and how much of a 'mindful' practice making these flowers could be.

I have to admit, I pre-cut all my pieces using my Cricut machine. Nice clean edges!

The roses were created by drawing a spiral and then rolling the felt up from the outer edge, popping a couple of stitches in every now and again to hold it together.

The rest consists of layering up colours, scrunching leaves and adding shapes to your heart's content! 

As optional extras, some felt pom pom centers came in useful, as did a packet of card toppers giving me some insect life on my wreath.

There are hundreds of tutorials on Pinterest for felt flowers but I found it more fun just to cut shapes and whack things together fairly organically without too many set rules.

In order to put the flowers on the wreath, you can use cotton or wire but I went for the ol' faithful hot glue gun which my inner-child just absolutely loves using. Super-secure in just a few minutes.


 Now in situ my wreath is a nice colourful addition to the house. It's quite tempting to make some more on wire stems to pop in jars for table decorations. Should The Outdoors ever become warm enough to require such decorating and dining!

Very simple but very cheerful :)

Feel free to comment and come and say hello on InstagramFacebookTwitterPinterest and Bloglovin too xxx


Nina Lee - Kew Skirt Extended Size Range

Bringing something slightly different today and breaking my mantra of 'Emma does not do skirts', with a skirt.

I was very lucky to be asked by Nina Lee to be one of the second batch of testers for their new extended size range. (All opinions here are my own there was no obligation).

The sizing of the beautiful Kew Dress (big fan, I've made it many times!) now come with a 16-28 option AND added skirt varieties! There's a B cup and D cup selection for the dress, multiple bodice/sleeve options an a-line skirt but now also a gathered and pencil skirt too.

I was testing the pencil skirt and the size chart put me exactly at a 16 waist and 18 hip making grading between the two very easy. 

The PDF goes together like a dream and only takes 23 pages which is instantly a relief for sticking together. 

Now I usually don't do skirts. Predominately because they tend to highlight my belly pooch (recently discovered #FUPA terminology! Google it, I'm not telling you) and also pencil skirts remind me of 'corporate' stuff. (Ick). Knowing how much I loved the Kew Dress and it's shape, I definitely thought this would be worth a go if only as an experiment.


The shaping of this skirt is gorgeous and I didn't feel self-conscious about that at all when wearing the end result! I love how it feels casual and comfortable without having to pull anything down or feel restricted in any way. Thanks to some nifty front and back darts it skims well. (Bum wrinkles courtesy of my t-shirt tucked in).

My favourite bit are the buttons down the front. As I didn't have any matching in the stash, multi-colour way the way forward and it worked in it's own way.

 I actually think I would wear this out and about - a little walk about a park perhaps when we are one day released.

Feel free to comment and come and say hello on InstagramFacebookTwitterPinterest and Bloglovin too xxx