Beam me up Freya

May I just start this blog by saying a HUGE thank you to everyone reading - as it turns out you are! How exciting (and slightly nerve wracking!). The comments on my previous apron post were just lovely and I appreciate that so much. I don't expect anyone to comment, as to be honest I don't do that much on others either, but it was so lovely seeing that people are out there.

Talking about out there... Greetings Earthlings.


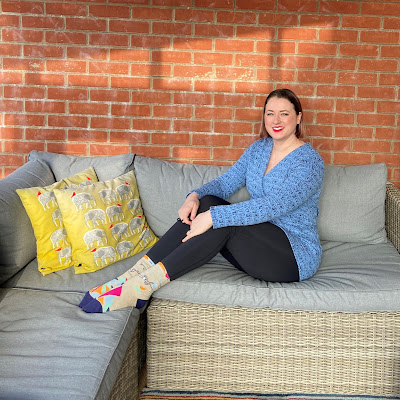
Sliding into this Sunday with a basic but peculiar little make in the form of Tilly and the Buttons Freya.

This seems to be an absolute classic of a pattern and I am once again seriously late to that party - must be the space-time-warp. 

This project cropped up on a whim because I had been watching so much Made by Cath Crafts on Youtube over the holidays when I was poorly. She has about 500 versions of this pattern and so curiosity and the need for a satisfying quick make got the better of me. 

I was convinced I wasn't going to like it but not so! (For some reason I always think the TATB patterns aren't for me but I've actually made quite a lot of them and they all get worn! (Save for the Bettine which didn't suit my shape much especially post-2018)Pattern size was a 7 graded to 8 at the hips - which is the largest the book runs to, although I believe she is expanding her size range. 

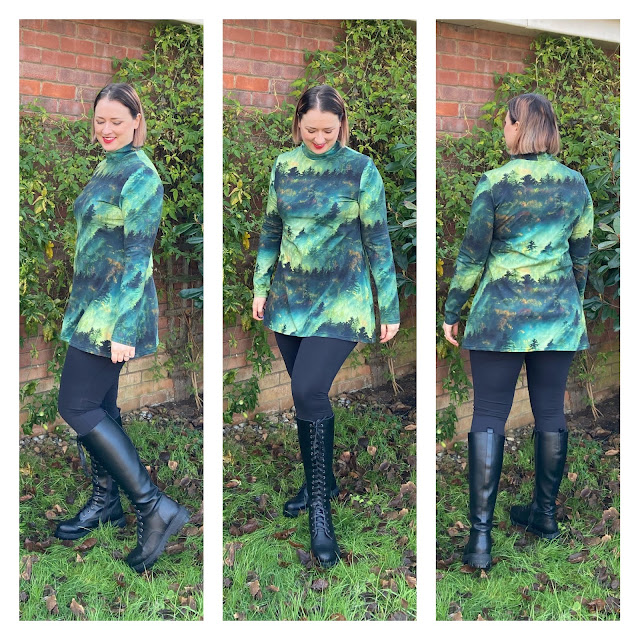
The Freya is actually dress length and so I chopped a few inches off to make it a tunic, just because that's how I'd probably get more wear out it.

There's a bit of pooling at the back due to sway-back however it doesn't bother me too much - I can't see it hehe. The Union Dress has more shape to it if you were after a fitted version as there's a centre back seam in that. 

The bit I do really like on this top is the mock turtleneck. It's really quite low and stands away from my neck and so whilst looking fairly smart and warm, is not massively irritating. 

The Freya as a top is almost identical to the Itch to Stitch Hepburn turtleneck (I overlaid them and tried them both on to see) - save for the Freya mock-neck-thing is much comfier in my opinion. Breathing room. (For those of us that don't deal well with your planet's atmosphere). What? Nothing.


 The fabric I used is a cotton jersey from Little Legs Fabrics called Forest Scenes. It was initially bought for PJs however here it is in it's new Freya format.

And the best bit - I've worn it! The day after I made this it had an outing in the wild so that is lovely. There's also another top version on my cutting pile in black Merino Jersey (how posh) to make a useful base layer for dresses. 

Thanks for reaching the bottom of this if you're still here!

Nanu Nanu

Feel free to comment and come and say hello on InstagramFacebookTwitterPinterest and Bloglovin too xxx

Wrapped Up with New Look 6581

 Hello!

Coming in today with a whole lot of cozy. And a surprising pattern choice perhaps as I usually just sew indie patterns. This is New Look 6581. And this version makes me feel a bit like a Super Hero!

Minerva are having a #sewnwithnewlook competition on their site this January so I thought I would join in.


(Please note that I did get this pattern New Look 6581 for free from Minerva as part of the brand ambassador programme. If you'd like to see my full Minerva write up and quilted elephant version please click here.)

This is View B of the pattern cut in a size 18-20 grading from bust to hip and it seems to have come out pretty true to size.

The pattern is very straightforward to put together and makes a nice change from a simple t-shirt shape.

My only gripe is the hole in the side of the top where the ties feed through looks quite messy from the inside. Not that it matters but I can see it if even no-one else does. I would definitely try a different way of doing this next time. Maybe a facing turned inwards or something similar. 

The facing I chose to topstitch down as otherwise it flaps about. I used my coverstitch for this and it looks quite pretty on the inside, picking up those lovely yellows.

Another feature I added to this was a little snap fastener to keep it secure at the chest and prevent any gaping. Just a personal preference.  A little vest underneath would work nicely too.

The hero of this top is really the fabric though - Van Gogh Starry Night inspired jersey - those colours. Sigh. 

I found this on Stretch Fabrics UK - definitely a site worth a browse if you're into your printed jerseys!

Bagel cat gave this one the sniff of approval whilst Clyde hibernates. Now there's a cat in the picture perhaps this look is more Super Villain?!

Feel free to comment and come and say hello on InstagramFacebookTwitterPinterest and Bloglovin too xxx

Sam Apron with a Tattoo Twist

 Happy New Year all :)

I'm baaaaack. I nearly wasn't as had a moment of being unsure whether to continue blogging or not however even if no-one reads this or finds it useful, it's a nice little log for myself. So it's staying. At least for now.

To start of 2022 I've got a great little project in the form of the free Sam Apron pattern from Helen's Closet. It's so much more than just an apron! This is a well engineered apron catering for all your possible needs. 

This project was a little twist of fate - I needed to make an apron to test run something for Norfolk Makers Festival but also my brother in law wanted something for his tattoo studio and for an upcoming Tattoo Convention in the US. (Electric Swan Tattoos in Lincoln - go check it out he's awesome).

Welcome the Luke Apron. All the bells and whistles. Or hardware and pockets as the case may be.

Personalized with a Cricut cut vinyl
 I used some denim from the ol' fabric stash (bought with good intentions of Jeans years ago - forget it) which was perfect for this. 

Construction is fairly straight forward however there are some lovely touches with the bias bound edges and top-stitched pockets and divisions. 

The apron pattern has an amazing cross-back version which I would like to try, however an overhead version was requested and I obliged. As this was a gift I also made it adjustable just in case by adding a slider buckle to the neck straps. 

The side ties and neck straps can be stitched directly to the apron however I wanted a bit of drama and opted for some antique brass eyelets and swivel clips. 

The bit I love about the pattern is the addition of these side bits - so you can hang a towel or something on them - in this case, a baseball cap.

It's not in pictures above but as this is heading overseas and representing the UK, we added a little patch at the last minute to match the shop's antique look flag and logo!

Finger's crossed it goes down well. This was an enjoyable make that took a long time becuase of all the 'extras' however a simple version would no doubt whip up a lot quicker.

Thanks for reading if you are out there - until next time, take care! x

Feel free to comment and come and say hello on InstagramFacebookTwitterPinterest and Bloglovin too xxx